Overview
This tutorial explains how syncing works in StudioCloud
How Syncing Works
While you work StudioCloud syncs your information up to the cloud. You can view the status of what is being synced to the cloud by looking at the sync status progress bar in the bottom of the StudioCloud program. The image below is of the bottom left of the StudioCloud program.

Eventually the sync status progress bar will display the words Success as shown in the image below.
Once the sync status progress bar shows the word Success it will automatically update the Last Successfully Sync date and time shown in the image below.

How to Identify Syncing Issues
If you look at the Last Successful Sync date and time and it is not within the last few minutes it can indicate any of the following issues:
- StudioCloud was just opened and it is now syncing with the cloud
- Resolution: wait for the information to be downloaded from the cloud
- The syncing bar text is not changing and I have waited a minute or two
- Resolution Step 1: Restart StudioCloud to see if it resolves the issue
- Resolution Step 2: Use the "Create a New Snapshot Option" below
- A lot of information was recently updated on another computer and StudioCloud is downloading that information from the cloud
- Resolution Option 1: Wait for the information to be downloaded
- Resolution Option 2: Use the "Create a new Snapshot Option" below
- A lot of information was recently updated in the StudioCloud program and StudioCloud is uploading that information to the cloud
- Resolution: You will need to wait for the information to be synced to the Cloud. There is not a faster way to resolve this issue.
- The Sync Status Progress Bar gets to the same resource over and over again and fails to sync to the cloud
- Resolution Step 1: Verify that you are not experiencing internet issues as this issue can be caused by internet problems
- Resolution Step 2: Restart StudioCloud to see if this resolves the issue
- Resolution Step 3: Use the "Create a New Snapshot Option" below
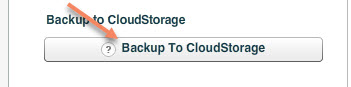
Create A New Snapshot Option
If you are waiting for a lot of information to be downloaded from the cloud you can do the following steps to speed up the process.
- Click on "Help" in the StudioCloud desktop program
- Click on "Backup to CloudStorage" button
-
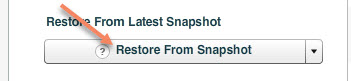
After the backup is completed do the following steps:
- Click on "Help" in the StudioCloud desktop program
- Click on "Restore From Snapshot" button
-
All of your information will be available to you once the snapshot is completed.
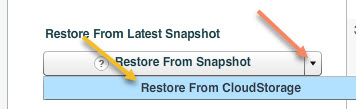
Restore From CloudStorage
If you have already created a snapshot or a StudioCloud tech created one for you then you can do the following steps to quickly update to have the latest information from the cloud.
- Click on Help in the StudioCloud desktop program
- Click on down arrow show in the screen shot below. The orange arrow in the screen shot is pointing to the down arrow.
- Click on the Restore From CloudStorage button. The yellow arrow in the screen shot below is pointing at the button
-
- Click on the Restore From Backup button for the latest snapshot/backup